Friday, February 12, 2016

Master Bedroom Progress, Part 3


With the windows mostly repaired and the walls painted, we're at the fun stage in our master bedroom. Now, most of the remaining work is about finding the right furniture, adding decorative accents, and optimizing storage.


Once again, I need to apologize for the poor lighting in these pictures. As I've mentioned before, this room actually has a wonderful amount of natural light; I'm just doing a terrible job of capturing it. 

Lighting
We're really pleased with the new (to us) light fixtures in this room. The porcelain table lamps were Ebay finds, and according to the seller they are converted oil lamps. My husband isn't convinced these lamps are as old as advertised, but even if they aren't, I still like the style. I have never ordered anything this fragile from Ebay before, and I was not sure if the lamps would arrive in good condition. They did. Each piece was carefully wrapped in bubble wrap. The shades were included in the purchase, and arrived in an entirely separate box to protect them from the heavy lamp bases.


The lamp bases are green with gold accents. The artwork and area rugs in this room have sage green elements, so these lamps work well in the space. We have an antique botanical print on one wall of the alcove, and an Asian silk painting on another of the alcove walls. The lamps work very well with these pieces. I like seeing these two photos next to each other, because it's a great example of how the paint color changes in this room based on the lighting conditions.

Antique botanical print. Natural daylight only.

Silk painting. Natural daylight, plus lamps
 
The brass chandelier is the real showstopper in this room. It was a Craigslist find and the posting said it was a converted oil lamp. We're positive that this chandelier was actually used as an oil lamp, because in many places we can see traces of oil residue. The chandelier needed to be rewired, so it was listed for a reasonable price. My father-in-law is very experienced with electrical work and has shared a lot of that knowledge with my husband, S. At this point, S has rewired a half dozen antique light fixtures. Rewiring lamps and hanging light fixtures is starting to feel like second nature to him.


Even so, rewiring this chandelier was a bit of a challenge. Parts of it were rusted and corroded, making it difficult to disassemble in order to replace the old wire. We special ordered the thinnest wire we could find, but even so, it was a very tight fit to get the wire through the narrowest section of this lamp. The first time he rewired the chandelier, the wire was short by about 1" so we had to start from scratch. Oops. It was a learning process, to say the least. The rewiring process took a couple of weekends and we're not quite done: One of the lightbulbs keeps burning out, so we need to troubleshoot that issue on some weekend when we feel like shutting off the second floor power.

The shades are my favorite part. They have hobnail details, and the glass is mostly clear, with milky white near the ruffled edges.


And when the chandelier is on, it casts a lovely glow around the room.


Storage
The one downside to this room is that it has limited storage. There's a single 36" wide closet, which you can see on the right side of the picture above. 36" may have been a sufficient amount of storage for a Victorian couple, but we have a very modern amount of stuff. We decided that my husband would store his clothes in the closet in our bedroom and I would store my things elsewhere.

But it wasn't really working out:


There were no shelves built into this closet, so he tried using a wire storage unit left over from his college days. But those wire storage units are never very sturdy, even when they are brand new. His was at least a decade old. It was so rickety that the shelves were constantly collapsing, so he ended up stacking his clothes in higher and higher piles in the closet. And on the floor. Outside of the closet. He was doing the best he could, but his closet was so dysfunctional that his clothes were always a mess. And then I would get cranky because of the lack of organization.

Two weekends ago, he built some custom shelving in his closet and it has made a vast improvement. There is still room to hang his suits and dress shirts. But now he has five cedar shelves for all his folded items.

We decided to use cedar because 1) it will deter moths and 2) the closet already had cedar paneling. Cedar is a pricey wood so the raw materials were about $60 for this project. The advantage of this custom unit is that my husband was able to build himself precisely what he wanted.


Fun fact: no sandpaper was used in the creation of these shelves. S decided to plane the cedar boards using antique wood planes. He has been building a collection of antique tools and has been experimenting with them for several weeks. He finds enjoyment in trying to use historic tools and methods when possible. 

Antique wood planes

Cedar shelves, after the boards were cut and glued together. There are three shelves pictured here.


Furniture

For the time being, my belongings are spread among the closets in our guest bedrooms (yes, plural closets. I have a lot of clothes. And shoes. And handbags). Eventually, we're looking to find a better storage solution for me. In my head, I'm picturing some sort of massive wardrobe with options for both hanging and folding clothes. If the wardrobe can transport me to Narnia, I'll be thrilled. But if the wardrobe holds my clothes, I'll be satisfied. I'm also considering some under-the-bed storage options from The Container Store to really maximize our usable space in this room.

We're also on the hunt for a pair of nightstands. We've checked several antique sores, but haven't found anything suitable yet. I'm not precisely sure what style we're looking for, but I think we'll know it when we see it. The clearance on either side of our bed is somewhat limited, so we'll need to find narrow nightstands. The wood tones don't need to match our bed exactly, but we want them to be in the same general family. In the meantime, we're using my husbands childhood nightstand and a red nightstand from a thrift store. Other than the nightstands and a wardrobe, there isn't much other furniture we'd like to add to this room. From a decorative standpoint, we'd like some sheer curtains (samples are on the way) and I think we could use a focal point above the headboard. But this room is coming along and it's a very comfortable space.

Thanks for reading, folks. Have a great weekend!


Bookmark and Share

Friday, February 5, 2016

Master Bedroom Progress, Part 2


When I last posted about our Master Bedroom, the walls were mostly painted and we had restored the first of the five windows. The bedroom was habitable, but far from complete. At the time, I had divided our remaining projects into "short-term" and "long-term" tasks. Here is that list, and an update of where we stand thus far:

Short-Term Project List
*Repair all windows - 75%
*Paint crown molding - NO
*Prep and paint narrow walls to the left of the alcove - YES
*Stencil ceiling - 5%
*Repaint and rehang entry door - YES
*Repaint and rehang closet door - NO

Longer-Term Project List
*Purchase new/antique nightstand(s) - NO
*Purchase antique table lamps - YES
*Purchase small antique chandelier - YES
*Hang some additional artwork - YES
*Refinish husband's dresser (not pictured) - NO
*Improve storage (maximize space in closet and under the bed; find/create some storage solution for me) - 50%.

As you can see from that list, we were a bit flexible with our approach to prioritizing tasks. We moved on to some of the long-term tasks before completing the short-term ones. This probably sounds like poor project management, but it was the right choice.

In this post, I'll talk specifically about repairing the windows and the walls next to the alcove.

Windows:
We've now restored four of the five windows in this room. They've each gotten soup to nuts restoration: first we stripped the old paint from the wood and hardware, then applied new glazing, new oil-based paint, new sash cords, and new brass weatherstripping. After repairing the first window, we identified three areas for improvement: improved speed, improved craftsmanship of our glazing, and improved craftsmanship of our paint job.


We've done a little better in all those areas, but we still have lots of room for improvement. But there was one area where we did far worse: keeping the glass intact.

When we repaired the first window, we removed all the crumbly glazing. We then removed the panes of glass completely, primed the window sashes, reinserted the glass and applied new glazing. When we tried this same approach for the second window, the glass shattered. On both the top and bottom sashes. When the first pane shattered, we thought it was a fluke. We were heartbroken, but figured that perhaps there was a hairline crack that we hadn't noticed. Then we cracked the second pane, and we became more concerned. Clearly we were doing something wrong.

We had no obvious explanation for the broken glass: we did not drop it or bump it against another object. We lifted it carefully and set it down carefully.

These are large panes of original wavy glass, and it turns out that they are so thin and brittle that simply holding them incorrectly can cause them to break.

When the glass broke, I was reminded of a conversation I had with an antiques dealer. He said that one of his biggest disappointments is breaking an antique that he knows has been treasured and passed down from generation to generation. There are few feelings worse than knowing that you are responsible for ruining an item that had otherwise stood the test of time. He was so right.

We were especially devastated when we learned that this glass was somewhat unusual for a house like ours. Our house was built c.1880 and glass manufacturing technology had recently made great strides. However, large panes of glass were still very costly. For this reason, most houses in the 1880s had windows that were built with two (or more) smaller panes of glasses on each sash. This is called a "two-over-two" configuration, and it's what we have on the rear windows and most side windows. On the front of our house, however, the windows have a single large pane of glass in each sash. This is known as a "one-over-one" configuration. I've seen these types of windows on the Victorian mansions in our town, but rarely on more modest homes like ours. The previous owners likely made a large investment when choosing these one-over-one windows, and I'm sure they were a point of pride for the house's inhabitants. The fact that the one-over-one windows are only on the front of our house shows that they were too costly to use throughout. We were so discouraged when the glass broke that we ended up stepping away from window repair for a few weeks and reevaluating our process.

When we resumed the window repair, we replaced the broken glass on the second window with old glass from an antique store. It's not as old or wavy as our glass, but we figured it would be a better approximation than using new glass.

Note: I apologize that these pictures are so dark. This room gets a lot of natural light, but I'm having a hard time capturing light in any pictures I take of this room. 


For the third and fourth windows, we decided to restore the windows without removing the glass, given our bad track record. In addition, both of these windows already had small cracks in the glass (not our doing!). We thought preserving the original glass was worthwhile, even if the glass isn't perfect. Our solution for now is to leave the original glass in place, and put a thin layer of epoxy over the cracked section. We'll see how well it holds up. If we ever have children, we may decide on a different approach. With our previous approach, we replaced all the old glazing. With our new approach, we just removed any loose glazing, then applied a thin layer of new glazing over the existing, intact glazing. We did not attempt to lift or remove the glass. Here is what the restored third and fourth windows look like.


I'd say that we're about 75% finished with the window repair in this room. Windows three and four still need new interior stops. We also still need to repair the fifth window (not pictured). When we finished the fourth window, it was late November or early December. Since we need to remove each window for about a month in order to restore them, we decided to wait until spring to tackle the fifth window. 


Here's another close-up picture of the restored window. The new brass weatherstripping has done a great job of eliminating drafts in this room. To make the seal even tighter, we added temporary weatherstripping cord for the winter months. In the picture above, it's that squiggly stuff. It looks terrible, but it's keeping our room warm, so we'll live with it for a few more months.

Walls:
When we removed the wallpaper from this room, we were in for a surprise. In the section of wall next to the alcove, the plaster was in very bad shape. Large pieces of plaster fell away from the wall, exposing our brick chimney. And we were in for another surprise: it appeared that several of the bricks had been chiseled away, leaving a hole the size of a dinner plate.


According to our mason, this hole in the brick likely resulted from a potbelly stove being piped into the chimney. At some later point, the stove was removed and the wall was patched with a new layer of plaster, without replacing the missing bricks. As you might expect, the new plaster was weak in this section since there was nothing (i.e., no bricks) for it to adhere to.

This chimney is nonfunctional, but from a structural standpoint, we didn't particularly like the idea of the missing bricks. We asked our mason to fill in the missing bricks to the best of his ability. Since we were already doing so much exterior masonry work, the incremental cost for this repair was relatively minor.

This is the last picture I posted of this wall, which shows the repaired brick. At the time, we were considering leaving this small portion of brick exposed.


I love the look of exposed historic brick. However, after staring at our exposed bricks for several weeks (or was it months?) we decided that it just looked unfinished. We tried putting a picture frame around it, but it still didn't look right. We decided that this section of exposed brick was just too small to look intentional.

We had two options: 1) remove more plaster, exposing a larger section of the chimney. Hope it looks right, or 2) repair the missing plaster.

Ultimately, we decided to repair the plaster. My husband balked at the idea of tearing perfectly good plaster off the walls. He's also not fond of exposing masonry that wasn't originally intended to be seen. He's a purist that way, I guess.

So, no exposed brick for our bedroom. I will just have to enjoy other people's exposed brick via Instagram and Pinterest. The struggle is real.

We repaired most of the walls in our bedroom using Big Wally's Plaster Magic. I've spoken about Big Wally's before, and it does a fantastic job of repairing small and large plaster cracks. But it's not intended to repair holes the size of a dinner plate. So, my husband learned how to use plaster and patched the hole. Then I applied several coats of joint compound, smoothing the surface as best as I could. Our repair isn't perfect, but it's pretty good for our first time using plaster.


My husband enjoys all the imperfections in the plaster walls, with the thought that it gives our home character. I haven't come around to that viewpoint yet. I tend to focus on every bump and dimple in the plaster, and wish I had spent a little more time prepping the walls before painting. In hindsight, I might have applied one of two more coats of joint compound to get the surface as smooth and straight as possible.

Even so, compared with where we started, I think this wall is a case of "done is better than perfect." There's no longer a hole in our chimney or our walls. That's a good thing. 


Stenciling:
In my short-term project list, I planned to stencil the ceiling. In some of the pictures above, you can see that I started the border. I am happy with how it looks so far, but I haven't made much progress. I'll finish this project eventually, but it turns out that stenciling a ceiling is an incredibly slow process. I'm doing it by hand and working in small sections. Each 4-6" section of ceiling requires climbing down the ladder, refilling the brush, and climbing back up the ladder. The ceiling is going to look lovely when it's done, but it's been moved to the long-term project list. I can't quite remember why I thought stenciling the ceiling was important enough to be a short-term project.

We've also added a few decorative touches to this room, like new table lamps, an antique chandelier, and some better storage. I'll save those for a future post. Thanks for checking in, friends!


Bookmark and Share

Wednesday, January 27, 2016

The Past Three Months

Hi, folks! I suppose I should take this opportunity to say Happy (belated) New Year. I should also offer some explanation for the lack of posting over the last three months.

Honestly, we have been working on home improvement projects and we've made some progress. However, most of those projects are still partially unfinished, so I delayed posting updates in the hopes of having some dramatic before and after pictures. I finally realized that if I wait to post until each of these projects is completely finished, I would leave you hanging until 2017.

And in the spirit of full disclosure, there's another reason I haven't posted much: some of our projects have been so tedious that I was worried they wouldn't make good blog content. But the truth is that rehabbing a historic home always includes tedious tasks, like stripping 19 million linear feet of trim, removing wallpaper from every room (or thinking about and dreading wallpaper removal), or glazing windows and waiting two weeks for the glazing to dry. These tasks, tedious as they sometimes feel, are part and parcel of any historic restoration. So, here's an update of what we've been up to these past three months.

Family Room

Papered House_Family Room Progress

When I last posted about our family room (here), I shared that we had preserved the wallpaper on two of the walls by covering it with a clear sealant. Those are the two walls that you can see in the picture above. On the other two walls, we started to strip the wallpaper because it was in particularly bad shape. Our plan is to eventually paint the two walls after we remove the wallpaper, selecting a paint color that complements the colors in the wallpaper. The good news is that the wallpaper preservation technique has held up well since that last post, which was about 8 months ago. There are no rips and the preserved wallpaper has not started to peel away from the wall.

Papered House_Family Room Progress_2


The bad news? In those same 8 months, I haven't made appreciable progress in removing the rest of the wallpaper. We use the family room on a daily basis, and on a daily basis, this is what I see while watching TV:

Papered House_wallpaper massacre
Behold: Wallpaper Massacre

Hideous, right? Can you believe that we've had house guests about a dozen times with the wallpaper looking this way? I should be ashamed to have people see our house in this condition, but I've become desensitized to how bad this room looked after seeing the Wallpaper Massacre on a daily basis. But rest assured: I've got a hot date with a steamer this weekend and will remove the rest of that wallpaper. (I know, I know...I'm so punny).

Since the wallpaper removal is incomplete, we also haven't repaired the plaster in this room as yet. There are some severe cracks in this room, so we know it will be a challenge.

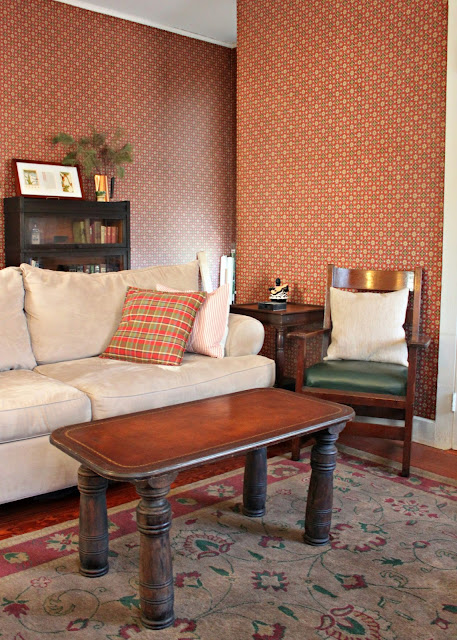
Nonetheless, we've added some furnishings to this room and it is starting to feel very cozy. Based on the colors of the wallpaper -- brick red, olive green, and burnt umber -- we decided to decorate this room in an Arts and Crafts/Mission style. One of our favorite recent additions is this antique armchair with a hunter green leather seat.

Papered House_Family Room_Stickley Mission Chair

It came from a local dealer who specializes in Arts and Crafts/Mission-style antiques. He showed us a  medallion stamped on this chair, indicating that it was manufactured by L. and J.G. Stickley in the 1920s. Elsewhere in the house, we have a piece of contemporary Stickley furniture that is very special to us because it was our first major purchase as a married couple. We were thrilled to find an authentic 1920s Stickley armchair for the family room, especially since Stickley furniture was so prominent during the Arts and Crafts period.

Another recent addition is this Arts and Crafts-style barrister bookcase.


This was a particularly serendipitous find. The previous owner had a barrister bookcase in this room and we loved the look. We searched for months for a barrister bookcase, but every time we saw one in an antique store, it would either be too expensive or already reserved by another customer. When we saw this one, we felt like we'd hit the jackpot: it was a great price and it just so happened to have some Arts and Crafts elements as well. We're currently using this as storage for our antique and rare books, as well as some old glass bottles.

Last, and certainly not least: this coffee table.

My husband made this. For less than $50. While I was visiting family in California.

Papered House_DIY Coffee Table

I think I should go to California more often.

He texted me a picture of the table the day before I flew back to NJ. Meanwhile, I was texting him pictures like this:


My husband builds furniture. I go to Catalina. That's a fair arrangement, right?

I felt a little bit guilty that I was having such a great time with my family in California while he was at home, going to the office and then working on our house in the evenings. But I won't let that guilt stop me from admiring that coffee table.  

There is an interesting story behind the legs. In my husband's hometown, there are designated clean-out weeks when people can leave trash by the curb. One of the large Victorian homes in his town was being renovated, and the owners had discarded an assortment of original woodwork. It was all solid black walnut, and most of it was intricately carved. It's hard to believe that anyone would throw that away. We rescued a few things from the side of the road, including the five large posts that we repurposed for our coffee table. I believe these were previously newel posts from a staircase. There were at least five identical pieces being thrown away -- perhaps more -- which suggests that there were several large, elaborate staircases in the same home. I would love to have seen those staircases in all their original glory.

These posts previously had several coats of dark varnish, which my husband removed. He also added a coat of walnut-colored stain, but kept the stain light enough that we can still see some of the wood grain. He trimmed four of the posts to an appropriate height, and used the fifth to make an apron for the table.

Papered House_DIY coffee table legs


After we found the "legs", we started looking around for something to use as a top for the coffee table. This vintage leather and wood table top was an eBay find, and cost us less than $40 including shipping. The leather has a few nicks, but is otherwise in great shape. And we particularly like the gold filigree detail around the edges.


Once the weather warms up, we'll take this table outdoors and add a layer of varnish to better protect the legs. We still have a few more pieces of scrap salvaged black walnut, and we're thinking of ways to use that as well. I wish I could write a step-by-step tutorial of how my husband made this table, but unfortunately, I'm not knowledgeable enough about woodworking to write detailed, informative instructions.

Exterior Projects

I've been feeling a bit better about the exterior of our house because the chimney saga is finally wrapping up. We had new copper flashing installed on both the side and rear chimneys. On the side chimney, which will remain non-functional, we had a copper cap installed at the top to keep out critters and protect the restored masonry from the weather. We asked our contractor to install the cap in a flush-mount configuration, so the cap isn't visible in these pictures. You'll just have to trust us that it's there (and honestly, we just have to trust our contractor that it's there, too!)

Want to see our new chimneys, all decked out in their shiny copper flashing? Here there are!

New copper flashing on rear chimney

 
Another view of the rear chimney

New copper flashing on side chimney

Pretty right?

We also asked the same contractor to evaluate the condition of our slate roof and gutters. We're rather fond of both our slate roof and the built-in copper pole gutters. Several of the grand Victorian homes in our area still have slate roofs and copper gutters. But on a more modest home like ours, slate roofs and copper gutters are somewhat rare. TPH's previous owners invested in maintaining these historic details and we'd like to do our best to preserve them for as long as it's practically and financially feasible.

Our roofing contractor said that most of the roof is in good condition, but he recommended replacing about 100-120 slate tiles on the left rear portion of the roof. These 120 tiles had exposed nail heads, indicating that those particular tiles had not been correctly installed. He also recommended replacing a deteriorated pole gutter on the left rear side of the house. Most of the gutters on our house are copper, but this one section had been replaced with aluminum. When our contractor came to evaluate the roof and gutters, this was the problem area he identified. You can tell where this gutter was replaced with aluminum because the color changes from green to brown.


We were glad to hear from our contractor that this was the only area needing immediate attention. We suspect that this gutter has been in poor condition for quite some time. The trim/soffit closest to this gutter was (and is) showing signs of rot, which we're attributing to years of poor drainage. When we had heavy rain, water would slosh off the side of the house rather than running down the gutter as intended.

Here is what the left rear portion of our roof looks like now, with the new slate tiles and copper gutter:


At the moment, the new gutter stands out because it is so much shinier than our other gutters. But in time, it will develop that same lovely green patina that's on our other copper gutters. From a functional standpoint, it's been very reassuring to have this repair complete. We received about 28" of snow in last weekend's blizzard, and as the snow started to melt, we've already noticed improved drainage in that section of the house.

The other exterior project we're working on is building/installing custom storm windows. I'll share more about that in a future post, once we've actually installed them. But for now, here's a picture of the first custom storm window we built.


We've also made some progress in the upstairs rooms, which I'll share in a few days. Thanks for sticking with me, friends!
Bookmark and Share