Full disclosure: This is a long post, filled with too many words and too few pictures. I won't be upset if you skip it entirely!
Here's
the short version: Our chimneys are a pain in the butt. We stupidly
spent $$$$ repairing a chimney, then discovered that it would never be
functional. Our fireplace is ugly. I complain a bit. We have issues with
some masons. I complain some more. One year later, repairs still aren't
done. Winter is coming. Where is my wine?
Here's the much longer version:
One
of the projects that's been hanging over our heads -- both literally
and figuratively -- has been the chimney repair. We have a chimney on
the side of our house and a corresponding fireplace in the dining
room. Here is what the side chimney used to look like.
We
also have a rear chimney that is the exhaust for our oil burner (hence,
no fireplace). Here is what the rear chimney used to look like.
When
we moved into TPH, we knew that the exterior of both chimneys would
need extensive repair. This picture doesn't accurately show the state of disrepair. When
we moved in, we could see through our rear chimney because it was
missing so much mortar. Bricks were coming loose and I couldn't help but
think that the chimney resembled a game of Jenga, just before the
blocks topple. The side chimney wasn't quite as far gone as the rear
chimney, but it was still in bad shape.
We
also knew that there was a good chance that our side chimney would need a
new liner. We decided to tackle the exterior portion of the project
before relining the side chimney, to avoid any further deterioration.
This turned out to have been a bad decision, as I'll explain later.
In
November of 2014, shortly after we moved in, we reached out to
several masons to request a quote. We must have called a dozen masons to
schedule a visit, but the response rate was abysmally low.
After
a few weeks of waiting for responses, we were getting impatient.
We asked the local historical society to recommend a mason. They spoke
very highly of a professional who had worked on several historic
buildings in town (We'll call him Mason 1). After looking at his past
projects we knew Mason 1 was the right choice. And honestly, since none
of the other masons had returned our calls, he didn't have much
competition.
He wouldn't be able to do the
work in the winter, so we waited for a few months to take further
action. The chimney repair was going to be pricey, so we didn't mind
holding onto the cash for a few extra months, anyway. We resumed the
process in February, submitting the necessary paperwork to our town. And
once the weather and our mason's availability synched up, he
rebuilt/repointed both chimneys. His work was completed some time in
late April/early May.
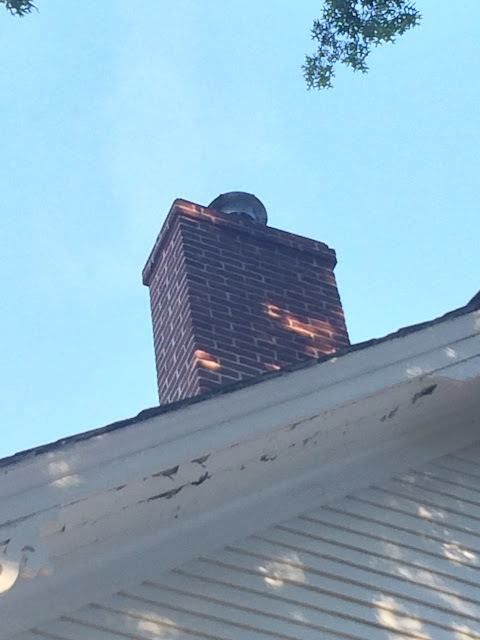
Here is a picture of our repaired side chimney. (Apologies for the poor photo quality)
And here is a picture of our completely rebuilt rear chimney.
I
don't know much about chimneys, but I think they look great. Mason 1
used historic reproduction bricks and lime-based mortar to
best replicate the construction and appearance of our original chimneys.
Our goal with TPH has always been to restore "in-kind", using original
materials and methods whenever possible. We were glad to find a mason
who shared this commitment. I can't say enough positive things about
this mason and his crew members. They were polite and considerate
through the entire process, and left a clean work space. (if you're
located in eastern PA or central NJ and need a mason, I'd be happy to
provide a reference!).
The only downside to
Mason 1 is that he does not install or inspect liners. But he gave us
the name of another mason (I'll call him Mason 2) who does. We reached
out to him to schedule a visual inspection and request a quote. Mason 2
came in mid-May and inspected the interior of our chimney. We learned
some interesting info from him.
See this fireplace? If you're thinking that it doesn't look particularly Victorian, you're right.
 |
| Why is this NEW thing in my old home??? |
Mason
2 told us that this fireplace was likely installed around 1920-1930
based on the type of bricks that were used. The fireplace was built
using butter joints, meaning that two bricks were "buttered" with
mortar as if they were slices of bread and pressed together like a
sandwich. In addition, he mentioned that the bricks on our fireplace
were actually meant to be used for exterior masonry. It's a bit odd that
they were used in an interior application (I have a theory about this,
but I'll save it for another time. This post is already too long). Finally, the diagonal orientation of
the firebox is not original. The original fireplace would have been
built flat against the side wall.
The good news: This fireplace is solid and well-built. Mason 2 was impressed by the quality of the craftsmanship.
The
bad news: From an aesthetic standpoint, this fireplace is all wrong.
Before we even set foot inside TPH, I could tell from the realtor's
listing pictures that this fireplace was a later addition to the home.
It's not historically appropriate and it doesn't match the character of
the house. I also think it feels too big for the room. Based on
what Mason 2 told us, the original fireplace was likely built to
accommodate a coal-burning stove. It was never meant to have an open
fire, although we can clearly tell that previous owners used
this fireplace to burn wood. The fireplace does not draft properly,
which explains all the soot and smoke stains around our mantle (yes, I
know I need to give that brick a good cleaning!).
The
very bad news: Unfortunately, whoever built this fireplace in the 1920s
didn't foresee 21st century code requirements. The flue is so narrow that our only option is to install a wood-burning stove. If we choose to
install a wood-burning stove, we cannot select a simple stainless
steel liner. According to Mason 2, there is precisely one (one!) liner product that will pass
code and fit into our chimney. It would be some sort of specialized cement liner that would be custom-made for our chimney.
Mason 2 happens
to be one of the licensed installers for that liner product. He warned
us that it could be a very expensive repair, but we requested a quote
anyway. This was in May. But it's now October and we still hadn't
received the quote, despite several attempts to follow up. We had a good
feeling about Mason 2 when he came to visit, but he doesn't seem
interested in our project anymore.
Since we
couldn't make any progress with Mason 2, we scheduled a third mason
(Mason 3) to inspect our chimney. Mason 3 did a visual inspection and
told us that a stainless steel liner might be possible, but not easy. We
started to feel hopeful that this project wasn't a lost cause. We also
started to feel hopeful that the project might be more affordable than
we initially thought.
Mason 3 came back a
second time to do a "Level 2" inspection, meaning that he viewed the
inside of our chimney with a digital camera. This time, the news was not
good: at its narrowest point, the flue was only 4" wide (narrower even than Mason 2 had realized). That's too
narrow for a stainless steel liner. It's too narrow for any liner, so this fireplace cannot be safely used. Mason
3 then suggested several short-cut options that led me to doubt his
familiarity with historic building materials and his adherence to code
requirements. As if that weren't bad enough, Mason 3 repeatedly called
me "sweetie" throughout the inspection. I've never been called "sweetie" by a stranger -- certainly not a male stranger. In this context if felt simultaneously unprofessional, patronizing, and
too familiar.
So, almost a year after we
started this process, we're back to the drawing board. We've resigned
ourselves to the fact that our side chimney will never be functional
unless we rebuild it from the ground up. This is not the conclusion we wanted to reach after doing pricey exterior repairs. A total rebuild would involve tearing down
plaster and disturbing walls. It would also cost a fortune, so it's at the very bottom of our priorities. We're kicking ourselves for spending thousands of
dollars fixing the masonry on a non-functional chimney. If we had known
that the side chimney would never be functional, we would have delayed its repair and allocated our resources towards other repairs. We're rookie homeowners and our inexperience
got the best of us. We were overeager to cross projects off our list and
didn't do as much due diligence as we should have before starting the
chimney repair. But hindsight is 20/20
and we learned valuable lessons.
Although the
side chimney will remain non-functional, there are still some
associated repair items we need to complete before we move on from this project. The side chimney needs to have a cap
installed so that critters won't intrude. We still need to have
copper flashing installed on both chimneys, since the existing flashing is in poor shape. The flashing isn't leaking yet but it's only a
matter of time, especially with wetter weather on the way.
But
there is a silver lining: We had set aside a significant chunk of cash
for The Chimney Liner That Wasn't. Now that we aren't lining the
chimney, we may have the budget for some other important exterior work.
We'd like to bring in a roofer to do some maintenance on our slate roof
and reline our Yankee gutters. We assumed that we'd need to wait until
2016 to do these projects, but now it looks like those projects might
happen this fall. Or, we may use the extra funds to replace my 13-year-old car. In either scenario, we'll be glad to have the cash on hand.

