Honestly, we have been working on home improvement projects and we've made some progress. However, most of those projects are still partially unfinished, so I delayed posting updates in the hopes of having some dramatic before and after pictures. I finally realized that if I wait to post until each of these projects is completely finished, I would leave you hanging until 2017.
And in the spirit of full disclosure, there's another reason I haven't posted much: some of our projects have been so tedious that I was worried they wouldn't make good blog content. But the truth is that rehabbing a historic home always includes tedious tasks, like stripping 19 million linear feet of trim, removing wallpaper from every room (or thinking about and dreading wallpaper removal), or glazing windows and waiting two weeks for the glazing to dry. These tasks, tedious as they sometimes feel, are part and parcel of any historic restoration. So, here's an update of what we've been up to these past three months.
Family Room


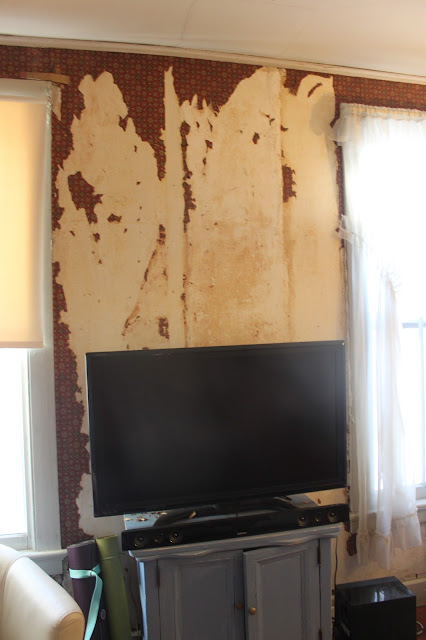
The bad news? In those same 8 months, I haven't made appreciable progress in removing the rest of the wallpaper. We use the family room on a daily basis, and on a daily basis, this is what I see while watching TV:
 |
| Behold: Wallpaper Massacre |
Since the wallpaper removal is incomplete, we also haven't repaired the plaster in this room as yet. There are some severe cracks in this room, so we know it will be a challenge.
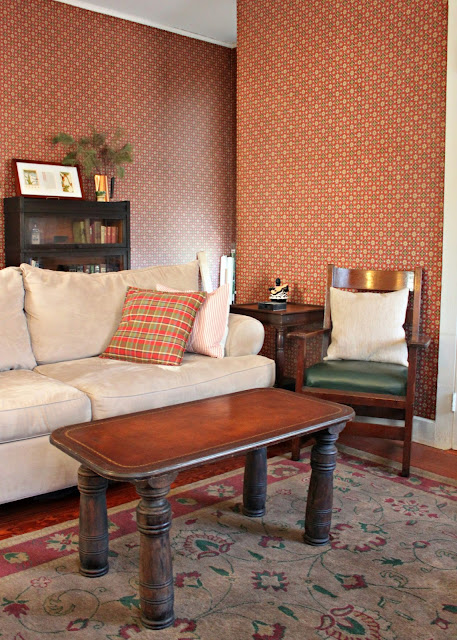
Nonetheless, we've added some furnishings to this room and it is starting to feel very cozy. Based on the colors of the wallpaper -- brick red, olive green, and burnt umber -- we decided to decorate this room in an Arts and Crafts/Mission style. One of our favorite recent additions is this antique armchair with a hunter green leather seat.

Another recent addition is this Arts and Crafts-style barrister bookcase.

This was a particularly serendipitous find. The previous owner had a
barrister bookcase in this room and we loved the look. We searched for
months for a barrister bookcase, but every time we saw one in an antique
store, it would either be too expensive or already reserved by another
customer. When we saw this one, we felt like we'd hit the jackpot: it
was a great price and it just so happened to have some Arts and Crafts
elements as well. We're currently using this as storage for our antique
and rare books, as well as some old glass bottles.
My husband made this. For less than $50. While I was visiting family in California.

I think I should go to California more often.
He texted me a picture of the table the day before I flew back to NJ. Meanwhile, I was texting him pictures like this:

 |
| My husband builds furniture. I go to Catalina. That's a fair arrangement, right? |
There is an interesting story behind the legs. In my husband's hometown, there are designated clean-out weeks when people can leave trash by the curb. One of the large Victorian homes in his town was being renovated, and the owners had discarded an assortment of original woodwork. It was all solid black walnut, and most of it was intricately carved. It's hard to believe that anyone would throw that away. We rescued a few things from the side of the road, including the five large posts that we repurposed for our coffee table. I believe these were previously newel posts from a staircase. There were at least five identical pieces being thrown away -- perhaps more -- which suggests that there were several large, elaborate staircases in the same home. I would love to have seen those staircases in all their original glory.
These posts previously had several coats of dark varnish, which my husband removed. He also added a coat of walnut-colored stain, but kept the stain light enough that we can still see some of the wood grain. He trimmed four of the posts to an appropriate height, and used the fifth to make an apron for the table.

After we found the "legs", we started looking around for something to use as a top for the coffee table. This vintage leather and wood table top was an eBay find, and cost us less than $40 including shipping. The leather has a few nicks, but is otherwise in great shape. And we particularly like the gold filigree detail around the edges.

Exterior Projects
I've been feeling a bit better about the exterior of our house because the chimney saga is finally wrapping up. We had new copper flashing installed on both the side and rear chimneys. On the side chimney, which will remain non-functional, we had a copper cap installed at the top to keep out critters and protect the restored masonry from the weather. We asked our contractor to install the cap in a flush-mount configuration, so the cap isn't visible in these pictures. You'll just have to trust us that it's there (and honestly, we just have to trust our contractor that it's there, too!)
Want to see our new chimneys, all decked out in their shiny copper flashing? Here there are!
 |
| New copper flashing on rear chimney |
 |
| Another view of the rear chimney |
 |
| New copper flashing on side chimney |
Pretty right?
We also asked the same contractor to evaluate the condition of our slate roof and gutters. We're rather fond of both our slate roof and the built-in copper pole gutters. Several of the grand Victorian homes in our area still have slate roofs and copper gutters. But on a more modest home like ours, slate roofs and copper gutters are somewhat rare. TPH's previous owners invested in maintaining these historic details and we'd like to do our best to preserve them for as long as it's practically and financially feasible.
Our roofing contractor said that most of the roof is in good condition, but he recommended replacing about 100-120 slate tiles on the left rear portion of the roof. These 120 tiles had exposed nail heads, indicating that those particular tiles had not been correctly installed. He also recommended replacing a deteriorated pole gutter on the left rear side of the house. Most of the gutters on our house are copper, but this one section had been replaced with aluminum. When our contractor came to evaluate the roof and gutters, this was the problem area he identified. You can tell where this gutter was replaced with aluminum because the color changes from green to brown.

Here is what the left rear portion of our roof looks like now, with the new slate tiles and copper gutter:
At the moment, the new gutter stands out because it is so much shinier than our other gutters. But in time, it will develop that same lovely green patina that's on our other copper gutters. From a functional standpoint, it's been very reassuring to have this repair complete. We received about 28" of snow in last weekend's blizzard, and as the snow started to melt, we've already noticed improved drainage in that section of the house.
The other exterior project we're working on is building/installing custom storm windows. I'll share more about that in a future post, once we've actually installed them. But for now, here's a picture of the first custom storm window we built.
We've also made some progress in the upstairs rooms, which I'll share in a few days. Thanks for sticking with me, friends!


